
강신규
[RN] React Native에서 Native Module 만들기(iOS) 본문

React Native로 앱 개발을 진행하다 보면은 JavaScript만으로 문제를 해결할 수 없는 상황들이 있습니다.
- 디바이스의 특정 하드웨어에 접근해야 할 때
- 높은 성능이 필요한 복잡한 계산을 처리할 때
- iOS에서만 제공되는 고유 기능을 사용해야 할 때
- 기존 iOS 네이티브 라이브러리를 활용하고 싶을 때
이런 경우 Native Module을 만들어 JavaScript와 네이티브 코드를 연결할 수 있습니다.
Native Module이란?
Native Module은 React Native의 JavaScript 코드와 iOS/Android 네이티브 코드 사이의 다리 역할을 합니다. JavaScript에서 네이티브 메서드를 호출하고, 그 결과를 다시 JavaScript로 전달받을 수 있게 해주는 중간 계층입니다.
이 글의 목적
이 글에서는 Swift를 사용해서 React Native Native Module(iOS)을 만드는 전체 과정을 단계별로 알아보겠습니다. 프로젝트 생성부터 실제 동작 테스트까지 실무에서 바로 사용할 수 있는 내용으로 구성했습니다.
프로젝트 생성
1. React Native Library 프로젝트 생성
npx create-react-native-library my-library

프로젝트 생성이 완료되면은 사진과 같은 형태를 가지게 됩니다.
my-library/
├── android/              # Android 네이티브 코드
├── ios/                  # iOS 네이티브 코드 (여기서 작업할 부분)
├── src/                  # JavaScript/TypeScript 인터페이스
├── example/              # 테스트용 React Native 앱
└── package.json
React Native Library 프로젝트에서 example 폴더는 개발한 Native Module을 테스트하고 검증하는 샌드박스 환경입니다.
모듈 개발시 워크플로우
1. Native Module 개발
my-library/ios/ 에서 Swift 코드 작성
└── 실제 네이티브 기능 구현
2. JavaScript 인터페이스 작성
my-library/src/ 에서 TypeScript 인터페이스 정의
└── 네이티브 모듈과 JavaScript 간의 연결점
3. 테스트 및 검증
my-library/example/ 에서 실제 React Native 앱 실행
└── 개발한 모듈이 실제 앱에서 어떻게 동작하는지 확인- example은 실제 프로덕션 환경과 동일한 조건에서 모듈을 테스트할 수 있는 환경
- 라이브러리 코드 변경 시 실시간으로 반영되어 개발 효율성 극대화
- 다른 개발자들이 사용법을 쉽게 이해할 수 있는 데모 역할
2. 기본 프로젝트 구조 살펴보기
생성된 프로젝트에서 iOS Native Module이 어떻게 구성되어 있는지 먼저 살펴보겠습니다.
기본적으로 다음 파일들이 생성됩니다:
ios/
├── MyLibrary.h          # Objective-C 헤더 파일
└── MyLibrary.mm         # Objective-C++ 구현 파일
#import <MyLibrarySpec/MyLibrarySpec.h>
@interface MyLibrary : NSObject <NativeMyLibrarySpec>
@end#import "MyLibrary.h"
@implementation MyLibrary
RCT_EXPORT_MODULE()
- (NSNumber *)multiply:(double)a b:(double)b {
NSNumber *result = @(a * b);
return result;
}
- (std::shared_ptr<facebook::react::TurboModule>)getTurboModule:
(const facebook::react::ObjCTurboModule::InitParams &)params
{
return std::make_shared<facebook::react::NativeMyLibrarySpecJSI>(params);
}
@end
헤더 파일 (MyLibrary.h)
- 클래스 선언과 외부에 노출할 메서드의 인터페이스를 정의합니다.
구현 파일 (MyLibrary.mm)
- 헤더에서 선언한 메서드들의 실제 동작 로직을 구현합니다(네이티브에서 실제 동작할 작동들, RN에 연결시키고 싶어하는 작동)
현재 코드에서는 multiply 메서드가 구현되어 있으며, 두 숫자를 받아서 곱한 결과를 반환하는 간단한 네이티브 기능을 제공합니다.
3. 기본 Native Module 연결 확인
1. 라이브러리 루트에서 의존성 설치
# my-library 루트 폴더에서
npm install
2. Example 앱 의존성 설치
cd example
npm install
3. iOS 의존성 설치
cd ios
pod install
cd ..
4. iOS 앱 실행
npx react-native run-ios

import { Text, View, StyleSheet } from 'react-native';
import { multiply } from 'react-native-my-library';

const result = multiply(3, 7);

export default function App() {
  return (
    <View style={styles.container}>
      <Text>Result: {result}</Text>
    </View>
  );
}

const styles = StyleSheet.create({
  container: {
    flex: 1,
    alignItems: 'center',
    justifyContent: 'center',
  },
});
코드를 살펴보면 react-native-my-library에서 multiply 함수를 임포트하고, JavaScript에서 일반 함수처럼 호출하고 있습니다. 하지만 실제로는 이 함수가 호출될 때 React Native Bridge를 통해 iOS의 Objective-C++ 코드가 실행되고, 계산 결과가 JavaScript로 반환됩니다.
Swift 파일 연결하여 새로운 기능 추가하기
기본 Objective-C++ 코드만으로는 복잡한 네이티브 기능을 구현하기 어렵기때문에 Swift를 사용하여 새로운 기능을 추가해 보겠습니다.
1. Swift 파일 생성
먼저 iOS 폴더에 새로운 Swift 파일을 생성합니다.
ios/
├── MyLibrary.h
├── MyLibrary.mm
└── DeviceInfoHelper.swift    # 새로 추가할 Swift 파일
import Foundation
import UIKit
@objc(DeviceInfoHelper)
class DeviceInfoHelper: NSObject {
// 디바이스 정보를 가져오는 메서드
@objc static func getDeviceInfo() -> [String: Any] {
let device = UIDevice.current
return [
"deviceName": device.name,
"systemName": device.systemName,
"systemVersion": device.systemVersion,
"model": device.model,
"batteryLevel": device.batteryLevel,
"screenBrightness": UIScreen.main.brightness,
"screenScale": UIScreen.main.scale
]
}
// 현재 시간을 특정 포맷으로 반환하는 메서드
@objc static func getCurrentTimeFormatted(_ format: String) -> String {
let formatter = DateFormatter()
formatter.dateFormat = format
return formatter.string(from: Date())
}
// 진동을 발생시키는 메서드
@objc static func triggerHapticFeedback(_ type: String) {
DispatchQueue.main.async {
switch type {
case "light":
let impact = UIImpactFeedbackGenerator(style: .light)
impact.impactOccurred()
case "medium":
let impact = UIImpactFeedbackGenerator(style: .medium)
impact.impactOccurred()
case "heavy":
let impact = UIImpactFeedbackGenerator(style: .heavy)
impact.impactOccurred()
case "success":
let notification = UINotificationFeedbackGenerator()
notification.notificationOccurred(.success)
case "warning":
let notification = UINotificationFeedbackGenerator()
notification.notificationOccurred(.warning)
case "error":
let notification = UINotificationFeedbackGenerator()
notification.notificationOccurred(.error)
default:
let impact = UIImpactFeedbackGenerator(style: .medium)
impact.impactOccurred()
}
}
}
}2. Objective-C++ 파일에서 Swift 메서드 연결
이제 기존의 MyLibrary.mm 파일을 수정하여 Swift 메서드들을 React Native에 노출시킵니다.
#import "MyLibrary.h"
#import "my_library-Swift.h"  // Swift 클래스에 접근하기 위한 헤더

@implementation MyLibrary
RCT_EXPORT_MODULE()

// 기존 multiply 메서드
- (NSNumber *)multiply:(double)a b:(double)b {
    NSNumber *result = @(a * b);
    return result;
}

// Swift에서 구현한 디바이스 정보 가져오기
RCT_EXPORT_SYNCHRONOUS_TYPED_METHOD(NSDictionary *, getDeviceInfo) {
    return [DeviceInfoHelper getDeviceInfo];
}

// Swift에서 구현한 시간 포맷팅
RCT_EXPORT_SYNCHRONOUS_TYPED_METHOD(NSString *, getCurrentTimeFormatted:(NSString *)format) {
    return [DeviceInfoHelper getCurrentTimeFormatted:format];
}

// Swift에서 구현한 햅틱 피드백 (비동기 메서드)
RCT_EXPORT_METHOD(triggerHapticFeedback:(NSString *)type) {
    [DeviceInfoHelper triggerHapticFeedback:type];
}

- (std::shared_ptr<facebook::react::TurboModule>)getTurboModule:
    (const facebook::react::ObjCTurboModule::InitParams &)params
{
    return std::make_shared<facebook::react::NativeMyLibrarySpecJSI>(params);
}

@end
3. JavaScript 인터페이스 업데이트
`src/index.tsx` 파일에 새로운 메서드들의 TypeScript 인터페이스를 추가합니다.
import { NativeModules, Platform } from 'react-native';

const LINKING_ERROR =
  `The package 'react-native-my-library' doesn't seem to be linked. Make sure: \n\n` +
  Platform.select({ ios: "- You have run 'pod install'\n", default: '' }) +
  '- You rebuilt the app after installing the package\n' +
  '- You are not using Expo Go\n';

// Native Module 인터페이스 타입 정의
interface MyLibraryInterface {
  multiply(a: number, b: number): number;
  getDeviceInfo(): {
    deviceName: string;
    systemName: string;
    systemVersion: string;
    model: string;
    batteryLevel: number;
    screenBrightness: number;
    screenScale: number;
  };
  getCurrentTimeFormatted(format: string): string;
  triggerHapticFeedback(type: 'light' | 'medium' | 'heavy' | 'success' | 'warning' | 'error'): void;
}

const MyLibrary = NativeModules.MyLibrary
  ? NativeModules.MyLibrary
  : new Proxy(
      {},
      {
        get() {
          throw new Error(LINKING_ERROR);
        },
      }
    ) as MyLibraryInterface;

// 기존 multiply 함수
export function multiply(a: number, b: number): number {
  return MyLibrary.multiply(a, b);
}

// 새로 추가된 함수들
export function getDeviceInfo() {
  return MyLibrary.getDeviceInfo();
}

export function getCurrentTimeFormatted(format: string = 'yyyy-MM-dd HH:mm:ss'): string {
  return MyLibrary.getCurrentTimeFormatted(format);
}

export function triggerHapticFeedback(type: 'light' | 'medium' | 'heavy' | 'success' | 'warning' | 'error' = 'medium'): void {
  MyLibrary.triggerHapticFeedback(type);
}
4. 테스트 코드 작성
이제 실제앱에서 내가 만든 함수들이 잘 작동하는지 `example/src/App.tsx`에서 새로운 기능들을 테스트해봅시다.
import React, { useState, useEffect } from 'react';
import { Text, View, StyleSheet, TouchableOpacity, ScrollView } from 'react-native';
import {
  multiply,
  getDeviceInfo,
  getCurrentTimeFormatted,
  triggerHapticFeedback
} from 'react-native-my-library';

export default function App() {
  const [deviceInfo, setDeviceInfo] = useState<any>(null);
  const [currentTime, setCurrentTime] = useState<string>('');

  useEffect(() => {
    // 컴포넌트 마운트 시 디바이스 정보 가져오기
    const info = getDeviceInfo();
    setDeviceInfo(info);

    // 현재 시간 업데이트
    const updateTime = () => {
      const time = getCurrentTimeFormatted('yyyy년 MM월 dd일 HH:mm:ss');
      setCurrentTime(time);
    };

    updateTime();
    const interval = setInterval(updateTime, 1000);

    return () => clearInterval(interval);
  }, []);

  const handleHapticTest = (type: any) => {
    triggerHapticFeedback(type);
  };

  return (
    <ScrollView style={styles.container}>
      <View style={styles.section}>
        <Text style={styles.title}>React Native Native Module 테스트</Text>
      </View>

      {/* 기존 multiply 테스트 */}
      <View style={styles.section}>
        <Text style={styles.sectionTitle}>기본 연산 테스트</Text>
        <Text style={styles.result}>3 × 7 = {multiply(3, 7)}</Text>
      </View>

      {/* 현재 시간 표시 */}
      <View style={styles.section}>
        <Text style={styles.sectionTitle}>현재 시간</Text>
        <Text style={styles.result}>{currentTime}</Text>
      </View>

      {/* 디바이스 정보 표시 */}
      <View style={styles.section}>
        <Text style={styles.sectionTitle}>디바이스 정보</Text>
        {deviceInfo && (
          <View>
            <Text style={styles.deviceInfo}>기기명: {deviceInfo.deviceName}</Text>
            <Text style={styles.deviceInfo}>OS: {deviceInfo.systemName} {deviceInfo.systemVersion}</Text>
            <Text style={styles.deviceInfo}>모델: {deviceInfo.model}</Text>
            <Text style={styles.deviceInfo}>배터리: {Math.round(deviceInfo.batteryLevel * 100)}%</Text>
            <Text style={styles.deviceInfo}>화면 밝기: {Math.round(deviceInfo.screenBrightness * 100)}%</Text>
            <Text style={styles.deviceInfo}>화면 배율: {deviceInfo.screenScale}x</Text>
          </View>
        )}
      </View>

      {/* 햅틱 피드백 테스트 */}
      <View style={styles.section}>
        <Text style={styles.sectionTitle}>햅틱 피드백 테스트</Text>
        <View style={styles.buttonContainer}>
          <TouchableOpacity
            style={[styles.button, styles.lightButton]}
            onPress={() => handleHapticTest('light')}
          >
            <Text style={styles.buttonText}>Light</Text>
          </TouchableOpacity>

          <TouchableOpacity
            style={[styles.button, styles.mediumButton]}
            onPress={() => handleHapticTest('medium')}
          >
            <Text style={styles.buttonText}>Medium</Text>
          </TouchableOpacity>

          <TouchableOpacity
            style={[styles.button, styles.heavyButton]}
            onPress={() => handleHapticTest('heavy')}
          >
            <Text style={styles.buttonText}>Heavy</Text>
          </TouchableOpacity>
        </View>

        <View style={styles.buttonContainer}>
          <TouchableOpacity
            style={[styles.button, styles.successButton]}
            onPress={() => handleHapticTest('success')}
          >
            <Text style={styles.buttonText}>Success</Text>
          </TouchableOpacity>

          <TouchableOpacity
            style={[styles.button, styles.warningButton]}
            onPress={() => handleHapticTest('warning')}
          >
            <Text style={styles.buttonText}>Warning</Text>
          </TouchableOpacity>

          <TouchableOpacity
            style={[styles.button, styles.errorButton]}
            onPress={() => handleHapticTest('error')}
          >
            <Text style={styles.buttonText}>Error</Text>
          </TouchableOpacity>
        </View>
      </View>
    </ScrollView>
  );
}

const styles = StyleSheet.create({
  container: {
    flex: 1,
    backgroundColor: '#f5f5f5',
  },
  section: {
    backgroundColor: 'white',
    margin: 16,
    padding: 20,
    borderRadius: 12,
    shadowColor: '#000',
    shadowOffset: { width: 0, height: 2 },
    shadowOpacity: 0.1,
    shadowRadius: 4,
    elevation: 3,
  },
  title: {
    fontSize: 24,
    fontWeight: 'bold',
    textAlign: 'center',
    color: '#333',
  },
  sectionTitle: {
    fontSize: 18,
    fontWeight: '600',
    marginBottom: 12,
    color: '#333',
  },
  result: {
    fontSize: 16,
    color: '#666',
    textAlign: 'center',
  },
  deviceInfo: {
    fontSize: 14,
    color: '#666',
    marginBottom: 4,
  },
  buttonContainer: {
    flexDirection: 'row',
    justifyContent: 'space-between',
    marginBottom: 10,
  },
  button: {
    flex: 1,
    paddingVertical: 12,
    paddingHorizontal: 8,
    borderRadius: 8,
    marginHorizontal: 4,
  },
  buttonText: {
    color: 'white',
    textAlign: 'center',
    fontWeight: '600',
    fontSize: 12,
  },
  lightButton: { backgroundColor: '#4CAF50' },
  mediumButton: { backgroundColor: '#2196F3' },
  heavyButton: { backgroundColor: '#9C27B0' },
  successButton: { backgroundColor: '#8BC34A' },
  warningButton: { backgroundColor: '#FF9800' },
  errorButton: { backgroundColor: '#F44336' },
});
cd example
npm install
cd ios
pod install
cd ..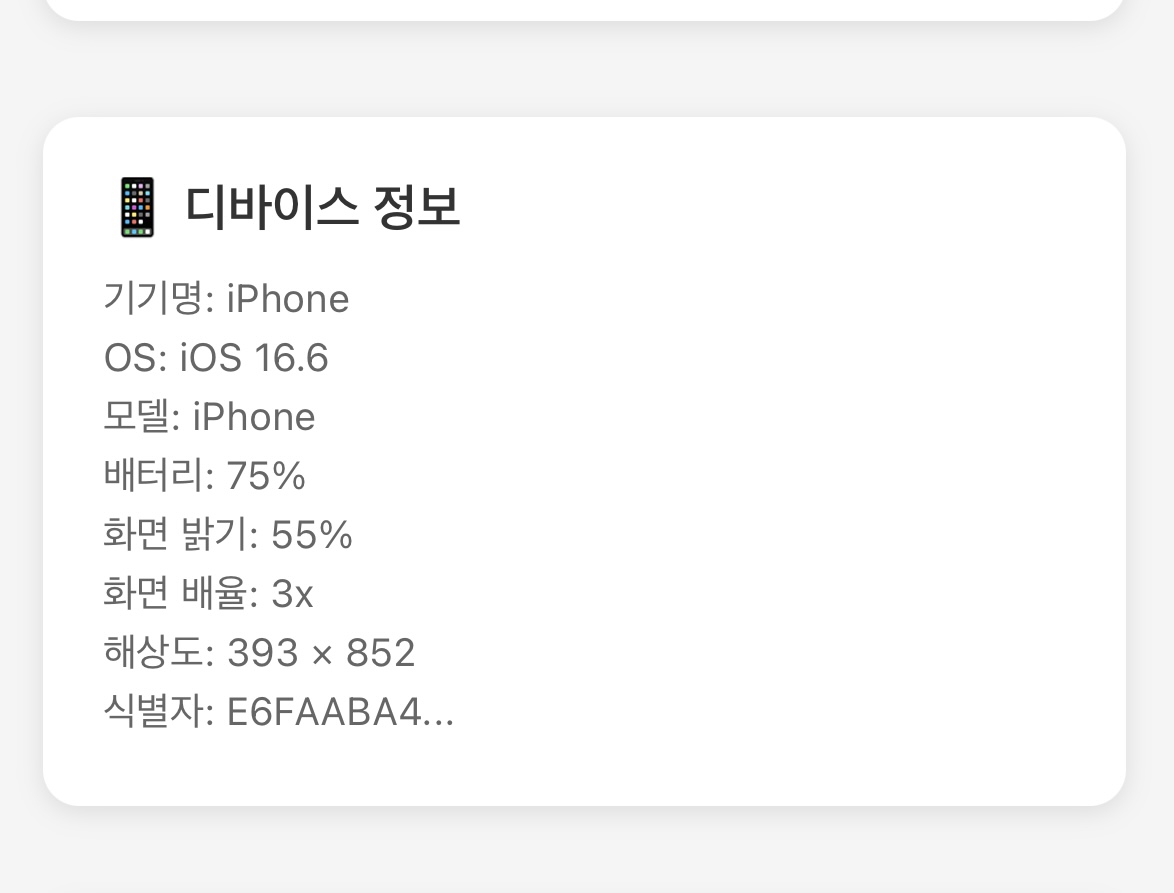
위 스크린샷에서 볼 수 있듯이, Swift로 구현한 네이티브 기능들이 성공적으로 JavaScript와 연결되어 실시간으로 디바이스 정보를 가져오고 있습니다.
Swift Native Module을 통해 React Native에서 iOS 고유 기능들을 자유롭게 활용할 수 있게 되었습니다.
'Framework > React-Native' 카테고리의 다른 글
| React-native (TypeError: cli.init is not a function in React Native) (0) | 2022.12.20 |
|---|
